Two months ago, I concluded the last post with “to be continued.” Its now time to continue.
As I left it, I was facing what I thought were hard choices, should I try to upgrade the Ubuntu installation to a newer version knowing that the update process could wreck the installed version? or just live with it?
I listed options to resolve my so-called dilemma:
Auto upgrade from 10.04 LTS to 12.04 LTS
Upgrade from 10.04 LTS to 10.10
Stay with 10.04 LTS and manually update the packages/applications
Just live with 10.04 and deal with issues as they arise.
Maybe this wasn’t a hard choice after all. The purpose of that Ubuntu installation was to learn Ubuntu, and one of the mottos of this blog is “Try, test and Learn”. So to just live with an obsolete version of Ubuntu just wouldn’t do.
So, I followed Option 1: Auto upgrade from 10.04 LTS to 12.04 LTS. And hey, everything went smoothly. The graphics card incompatibility about which a warning appeared during the upgrade did not appear fatal, or appear at all.
Ubuntu 12.04 LTS appears stable, and I am having no problem with it that some self-education won’t resolve.
The only new annoyance that I have encountered is that I am asked to authenticate myself to my wi-fi server every time I start the system. Why isn’t the passphrase saved in a key ring like it was in the previous version, and it is in Windows and MacOSX? Don’t know.
One of my long-time goals has been to acquire some proficiency in Linux. How could I credibly call myself a geek without being conversant in Linux! Over the years, whenever I’d get stuck on a technical computer issue, my friend Ray would come to the rescue with a Linux based solution. He told me about Knoppix, and I tried it (that is I started from a live CD) but though it was nifty, I did not install it.
A year ago, I replaced my 10 year old S4300NX COMPAQ desktop running Windows XP with a brand new Dell XPS 8300 with Windows 7, and the Compaq was set aside, thinking I would eventually install a Linux flavored operating system. That time has come.
First question: Would it be Ubuntu or Knoppix. Years ago, I had downloaded images of both. I decided on Ubuntu for no reason other than it seemed (based on the number of titles of books of Ubuntu, exceeding the number those for Knoppix) better supported. I did not consider other flavors.
So I had that old (?) Ubuntu CD; it was unlabeled. I inserted it in the CD drive and it loaded the operating system. The version was 8.04 (dating back to 2009). The choice was to run Ubuntu from the CD or to install it on the drive. I was ready to install it. My initial plan was to install it with dual booting, keeping XP and adding Linux. The install dialog seemed to indicate that this was not possible because there was not enough free contiguous disk space to install ubuntu. I let it go ahead and reformat the partitions holding Windows XP. I didn’t really need it. And install it did.
In the meantime, I was downloading the latest version of Ubuntu (“12.04 LTS”, where LTS stands for ‘long-term support’), and burned it on a CD. I thought it would come in handy, and I would over-write version 8.04 on the Compaq with 12.04 LTS. I’ll come back to that.
By now I had Ubuntu 8.04 on the Compaq. The first problem was that the computer was off the grid! No internet. The system would not recognize the Asus (WL-138g v2) wifi card. Ok, probably no driver. My first thought was to try installing the Ubuntu from the new 12.04 LTS disk, it should, I thought, have better built-in drivers,. But, oops during installation, the system crashed producing code dump that included the ominous words “kernel bug”. It seemed unrecoverable. I tried using the 12.04 CD twice: The first time booting from it, and the second time starting with the 8.04 loaded on the system and reading the 12.04 LTS from it. The unrecoverable code dump crash happened both times.
I copied it from the download computer to the Compaq on a USB stick, but once there I didn’t know what to do with it. The included README file was written for linux geeks, and I don’t yet belong to that elite tribe. So, back to google for a more accessible solution. This is what I found: http://ubuntuforums.org/showthread.php?t=1649426. Two solutions were proposed in that forum:
In message #3, chili555 proposed a fix. He attached a driver at ucode5.fw.zip . That didn’t work for me, just as it failed for Green Moon, who first asked the question and started that thread. In message #8, chili555 proposed using b43.zip instead. I followed the instructions (again), rebooted the computer, and WOOHOO, I was prompted for my userid and password to connect to my network.
Now connected, and with ubuntu installed, the next challenge was to update and/or upgrade ubuntu as much as possible. Keep using 8.04 did not make any sense. Released April 24, 2008, it had reached its End-of-Life (EOL) just over 3 years later on May 11, 2011. After a release passes EOL, security and critical fixes are no longer released. In short order I was able to update 8.04 to 8.10, then 9.04, then 9.10, all by downloading and installing fresh (but expired EOL’d) .iso images. Next 9.10 updated to 10.04 LTS using Update Manager which is included in Ubuntu. The difference (as I understand it) is that it is not possible to use the update manager to go to another (newer) EOL release, but since 10.04 LTS is still considered a Stable release, (see https://wiki.ubuntu.com/Releases), the auto upgrade path was still available.
Getting beyond 10.04 LTS is the current challenge. First, there is a lack of clarity as to the status of the that release. According to https://wiki.ubuntu.com/Releases, the desktop version of 10.04 LTS has in fact, expired on May 9, 2013, and it is the server version that remains supported for two more years. Practically, here are the choices that I must explore. Whether that choice is available determines the options that I have:
1. Auto Upgrade from 10.04 LTS to 12.04 LTS
2. Upgrade from 10.04 LTS to 10.10
3. Stay with 10.04 LTS and manually update the packages/applications
4. Learn to live 10.04 LTS, and cope with the underlying issues.
Clearly the first path would be the best, and the last, the worst. The relative advantages of 2 and 3 are not yet clear to me, especially as I don’t know if they are available as options. In fact, all of 1, 2 and 3, present challenges. Whether these challenges constitute insurmountable obstacles remains to be determined.
Going through these options:
1. Auto upgrade from 10.04 LTS to 12.04 LTS:
By Auto upgrade, I mean to use the ‘Update Manager’ application included in the Ubuntu distribution and found on the Menu under System|Administration|Update Manager. To upgrade to 12.04 LTS, one must go to System|Administration|Software Sources and select ‘Long Term support releases’ under the ‘Release Upgrade’ section of the Updates tab. Then run Update Manager. [An alternative to going through ‘Software Sources’ is to press the ‘Settings’ button at the bottom left of the Update Manager dialog. That button calls up the Updates tab under ‘Software Sources’] Anyhow, the Update Manager shows ‘Your system is up-to-date’, but then advises New Ubuntu release 12.04.03 is available. Well then, I click on the ‘Upgrade button’, I am presented with the new release note, and then this warning:
Your graphics hardware may not be fully supported in Ubuntu 12.04 LTS.
The support in Ubuntu 12.04 LTS for your Intel graphics hardware is limited and you may encounter problems after the upgrade. For more information see https://wiki.ubuntu.com/X/Bugs/UpdateManagerWarningForI8xx Do you want to continue with the upgrade?
Notice the warning says ‘may’! What does the information in that link say? It pertains to upgrades of systems with ‘i8xx graphics hardware’. It also says: “The current -intel driver should still operate on the i830 and i855 families (i810 is considered a lost cause now). “
Subsystem: ASUSTeK Computer Inc. Device 80a5
Flags: bus master, fast devsel, latency 0, IRQ 16
Memory at f0000000 (32-bit, prefetchable) [size=128M]
Memory at fe780000 (32-bit, non-prefetchable) [size=512K]
I/O ports at ec00 [size=8]
Capabilities: <access denied>
Kernel driver in use: i915
Kernel modules: i915
So I have i915 chips. Does that mean that I am safe since it belongs to the i9xx family of chips rather than the i8xx family. Maybe, but I still have cause to worry for three reasons.
1. The Update Manager detected a suspect chip to give me that warning about the upgrade. Maybe the i9xx and the i8xx chips are very similar and be similarly vulnerable?
2. The initial attempts at installing the 12.04 LTS distributions had failed with the code dump from which the system could not recover.
3. If I were to proceed with installing the 12.04 LTS distribution and ended with an unstable setup, I would have to restart with an older distribution and start again, since I assume there is no elegant downgrade path from a newer unstable setup to an older more stable one.
For these reasons, I decide (for now) not to upgrade to 12.04 LTS
2. Upgrade from 10.04 LTS to 10.10
I tried two approaches for that upgrade:
a. The first approach was to download the .iso image of that version and to apply it from the terminal console with the following commands:
sudo mount -o loop ~/Desktop/ubuntu-10.10-alternate-i386.iso /media/cdrom0
gksu “sh /cdrom/cdromupgrade”
This is the same approach I took to apply the updates from 8.10 to 9.04 to 9.10.
I encountered the following obstacle:
Could not calculate the upgrade
An unresolvable problem occurred while calculating the upgrade:
Can not mark ‘ubuntu-desktop’ for upgrade
This can be caused by:
* Upgrading to a pre-release version of Ubuntu
* Running the current pre-release version of Ubuntu
* Unofficial software packages not provided by Ubuntu
If none of this applies, then please report this bug against the ‘update-manager’ package and include the files in /var/log/dist-upgrade/ in the bug report.
b. Upgrade through ‘Update Manager.
This doesn’t work because 10.10 is no longer supported
3. Stay with 10.04 LTS and manually update the packages/applications
Well, lets start with Firefox!. The version of Firefox in 10.04 LTS is 20.
I downloaded a version 23 package from the mozilla website. However, I found no instructions as to how to install it. The advice is to use the installed package manager to upgrade Firefox. But the package manager does not work since 10.04 LTS is no longer supported.
4. Just live with 10.04 and deal with issues as they arise.
Maybe this is the only option until I figure a way to upgrade to 12.04 LTS. These are the issues I need to look into:
1. Mouse is over-sensitive, or not sensitive enough
2. Install printer driver for Epson Workforce 845
3. See Windows PCs from Ubuntu
4. See Macs from Ubuntu
When television was in its middle years and receivers were analog, videocassette recorders (VCRs) were a most common accessory. People would record their favorite shows on VHS (or Beta) tapes to watch later and reuse, or in many cases for pack rats to keep in their collections.
Now, televisions are digital and at least for consumers who get their tv by cable (or from satellite), PVRs have replaced VCRs. Yet, nothing has really replaced the VHS tapes. My collection of recorded television shows stopped growing when our digital television replaced the old analog one. [That may be a good thing, but that’s another story].
Why this is so is another story! In short the television stations, but mostly the cable companies were worried that viewers would make perfect copies of their shows and collect them, or skip the commercials when playing them back. So the cable encrypted their signals and Personal Video Recorder (PVR) manufacturers only sold units that combined signal decoders with recorders and these units would be locked to particular cable operators. You can buy your PVR from your cable company, or from your local electronic big box store but still locked to particular cable companies. This is the same business model as for mobile phones.
But what if you really wanted to save a copy of a show off the PVR to play back on a computer or another device? This post is about how I went about doing it.
Let’s start by looking into the question of what is a PVR. It is digital set-top box combined with a digital video recorder. As far as I know, there are digital set-top boxes sold without recorders but digital video recorders sold by themselves are a specialty accessory. The set-top boxes by themselves are only devices that receive an encrypted video signal through broadband cable, decrypt them and pump them out to the television monitor. The PVR adds a hard drive to optionally record shows for later playback. But these recordings cannot be accessed by a computer connected to the PVR via USB, and needless to say, PVRs don’t come with DVD recorders. So even if you physically removed a PVR’s hard drive and placed it in an HD enclosure (bye bye warranty!) and connected it to a computer, you would be no further ahead, because the video files on the PVRs hard drive are encrypted, and can only be decrypted within the PVR unit.
So the only way to get around this obstacle is to play back the recorded video, but instead of pumping the video to the television, one would send the video signal to a computer where it could be recorded. But how?
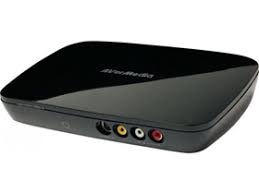
My internet research identified two products that would accept a HD digital video signal and convert it to something that can be saved on a computer. These are:
Basically these two products do the same thing.and that they even come bundled with the same recording software from Arcsoft TotalMedia Extreme. They both accept Digital Video Capture from the Component (YPbPr) output of the Set-Top PVR, and transcodes it in real time to H264 for saving on the computer.
I bought the AverTV unit because of slightly better reviews on the internet (“more solidly built”) and its slightly lower price.
Next came the installation, both hardware and software. While the hardware installation should in principle be straightforward, a slight problem arose: while the quick install guide sheet that came with the unit could bear some improvement (better illustrations), the puzzlement was why the component cable that came in the package was marked as intended for the output ports of the AverTV box rather than for the input? The guide clearly indicated ‘cable not included’ besides the input ports. Why assign the included component cables to the output ports, rather than to input? Who knows! In any case I had a second set, and I connected one end to the YPbPr output port of the PVR, and the other to the input ports of the AverTV box. I also connected a USB cable from the AverTV box to the computer.
The software, (Total Media Extreme ‘TME’) from Arcsoft, as well as the AverTV driver had already been installed on the PC. So with TME launched, I entered and started the record component of TME; the source was recognized right away to be the AverTV, and yeah, the audio came on live right away, but alas no video!
What was going on? Was the driver not installed properly? Was the AverTV unit defective? Maybe the cables were defective or not connected right? Or maybe there was no video being pumped from the Set-top box?
Well I checked and reinstalled the driver, wiggled then changed the component cable. How would I test if the AverTV hardware unit was working properly, or defective? I don’t know, but noticed that the lights on the front of the unit were yellow when all the illustrations online showed them to be blue. That was a clue, but only a clue, as I could find no guide to the meaning of the indicator colors. Anyway, I took the clue to mean that there was no video being received, but why?
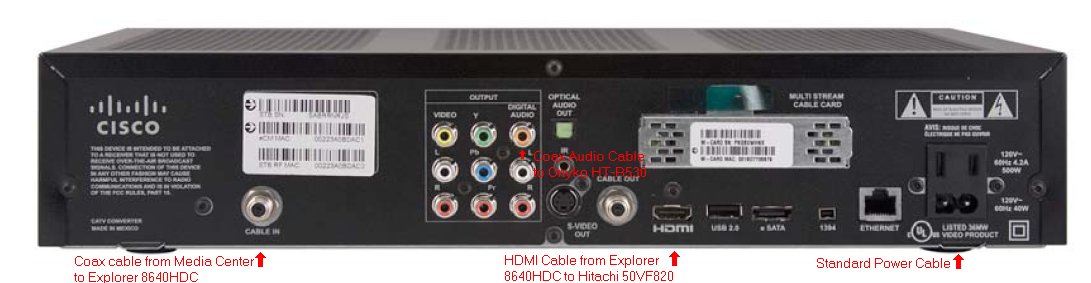
Before buying the AverTV DVR, I had inspected the ports at the back of the Rogers branded and locked Cisco Explorer 8640 HD PVR. There was the HDMI port sending video to the TV, there were composite ports and S-Video ports to send signals to old fashioned analog TVs, and there was the component YPvPr ports for sending signals to HD TVs as an alternative (?) to HDMI.
I have a Pinnacle USB video capture device for capturing analog videos, and indeed it captured low res video when connected to the composite ports of the PVR. So if the composite ports worked, why not the component?
Could the output port be selected programmatically? I searched the online manual for the PVR, but nothing there showing how to bring the YPvPr ports alive.
Think of your mobile phone: typically the audio comes out of the unit itself. If you add an external speaker, the internal speaker was silenced. Maybe the same happens here! So I thought what if there was no HDMI. So I pulled the HDMI cable out, and eureka, it worked. Yay.
Now doing all that is really a pain. In my case recording requires me to pull the PVR out of a cabinet that has no open back, pull out the HDMI cable, and when I’m done reverse the process, insert the HDMI cable back into the back of the PVR. And of course, when copying PVR clips to the computer, I cannot watch anything on TV.
Clearly all this is annoying. I have no idea if there a better way to record, and specifically to send the PVR signal to the YPvPr ports without pulling the HDMI cable out. Is the PVR engineered this way for technical reasons, or simply to discourage digital recording. I really don’t know.
In an earlier post, I explained the name of this blog, “Try, Test and Learn” to mean that I wanted to learn the ins and outs of WordPress. Maybe I’ll learn something about WordPress with this post, but that would be incidental to its purpose which is simply to write an account of a video conversion and manipulation project which occupied many evening and weekend hours over several months.
My friend (and boss) John MacMillan, (‘Mac’) is also a stand-up comedian. Last February, he, together with several other guest artists who are also my colleagues, performed for charity at the Pilot, a Toronto jazz club.
The show was professionally videographed, but several months on, Mac had not released any of the recordings. I asked why, and he explained that: 1. There were 9 files, 22.06 GB in all, and therefore unmanageable, and 2. they didn’t play properly. I was intrigued by the problem and asked him what he meant. He brought his new MacBook Pro, and clicked on one of the smaller files. The files had the .mov extension which was associated on his machine with QuickTime. Alas, QuickTime responded with “The document “Feb11-2011-02.mov” could not be opened. The movie is not in a format that QuickTime Player understands. You may need to install additional software to open this time of file” The options were “Tell Me More” and “Ok”. “, but not saying which additional software was needed. I suggested he try VLC. VLC showed the Video, but no sound. Stumped, I asked him to give me one of the smaller files so that I examine them on my own.
So he have me a copy of the 2nd file of 9. It was 293.8 MB and 64 secs long, and I set out to figure out what was the problem with it. I tried again playing it in all media players I had on my MacBook Pro and my Windows machine.
These were my findings::
VLC (Mac and Windows): Video, No audio.
RealPlayer, DivX Player (Mac and Windows): Audio, No Video
iTunes (Windows): Audio, No Video [iTunes for Mac didn’t Play it at all]
The task
In any case, it was clear that even if I was to be find a player that would play the .mov files natively, I would have to drastically reduce the total file sizes; 22 GB for two hours max of video was insane. My task would be to make the files playable, and to make their size manageable. Two hours of video should fit nicely on a standard DVD.
The first step was to figure out what kind of file I was dealing with:
Here are the parameters as shown by the Mac versions of QuickTime (v10) and VLC (1.1)
Original file parameters (from QuickTime Movie Inspector)
Media Information (VLC)
A videographer friend of my daughter, Janet identified the original files as being native to a Sony XDCam.
In converting the files, I wanted the resulting video file to be as close to the original as possible, ie. Resolution 1980 x 1080, and audio in stereo, (or two channels). Of course, the resulting file had to pass the subjective look and hear test, and to be reasonably sized. I tried several converters, generating test file after test file. For example, an .avi file looked fine, but the audio was mono.
First Conversion attempt
Mr. Video Codec (my nephew, Anthony J) recommended that I “transcode … to H.264 (Main or High Profile) with AAC audio in an MP4 or MOV container, (I) should get very nice quality at about 5 Mbps.”. So I had to find a converter that encoded those specs.
After trying several converters, I found the Mac version of the free Kigo Video Converter (http://www.kigo-video-converter.com/free-video-converter-mac/ ) and it seemed to fit the bill. When converting to MP4, Kigo offers 3 codecs: xvid, mpeg4 and x264. Among Audio settings, I chose the aac codec, and audio channel: 2, (assuming this to mean that two channels were retained after the conversion. There is a choice for A/V sync with the choices being ‘default’ or ‘basic’. I tried both settings and didn’t notice any difference. The resulting .mp4 file seemed just fine. The .mp4 played in most players, the sound was in stereo and the file size was reduced from 293.8 MB to 7.3 MB.
Something went wrong!
With this solution in hand, I asked Mac to send me the remaining 8 MOV files for similar conversion. With these, I proceeded to apply the same conversion using Kigo to them. While some of the resulting .mp4 files were fine, (at least) one had no sound, and another had a two minute stretch of silence in the middle. Clearly it was time to “go back to the drawing board”; What could have gone wrong? Was there really no audio on one of the recordings ?
I played the problem .mov with RealPlayer, vlc etc, and the result was consistent with the earlier results: no video with RealPlayer, and no audio with vlc. But the important point was that indeed there WAS audio in that file. Here is how the waveform for that file looked in audacity (http://audacity.sourceforge.net/ )
It seems that one track channel was muted, while the other had audio. But why didn’t Kigo pick it up? I have no idea
In my first attempt, the result was the same as with Kigo. No sound.
I then noticed that under the audio settings, there was a button “Add All tracks”.
Track 0 only (default)
By default, only Track 0 was showing. I pressed the “Add All Tracks” button, and Track 1 was added.
Track 0 and 1
I carried out the conversion, but still no sound. One last try, I thought, what about deleting track 0 ?
Track 1 only
BTW, Handbrake has another interesting feature: A preview functionality. Basically, it allows you to encode a 7 second snippet to check the result of the settings before going through with the conversion, and yes indeed, by deleting the empty Track 0, the conversion was successful with both video and audio. The original 7.24 min .mov was 2.03 GB, the result only 248.7MB.
There was that other problem of the videoclip with a 2 min audio gap. Here is its waveform:
What could I do to restore these two minutes, even if in mono? [And why did those two channels look so different ?]
The solution was to run Handbrake adding both tracks, with their order reversed, ie. track 1, before track 0, and that worked.
One thing I must state on the record: a lot of what I was doing was really “Trial and error. Some things worked, other didn’t, and sometimes I would rerun a conversions with what I thought would be the same settings and get better or worse results. Frankly, I didn’t know exactly what I’m doing, just trying one thing after another. So if you were to try following the steps I describe, I wouldn’t be surprised if slightly different results came about.
In any case, I eventually had all 9 .mov files converted to much smaller mp4s. The 22GB of .mov files were now 3GB in mp4s. The initial task was now complete.
Splitting, splicing and more post-processing
Of the 9 files, 6 were uninteresting short outtakes, leaving 3 for further processing. Number 9 was a discrete clip of one act. Number 6 was a continuous 54 min clip that needed to split into 4 parts, and Number 5 was the continuation of the 4th segment of number 6.
So how to split an MP4 video file, and secondly how to splice (merge) two MP4 files together.
For splitting the MP4 video file, I used MPEG Streamclip (http://www.squared5.com/). Just open the source file, play it until the spot where you need to apply the cut, and press “O” (or out).
The first subclip of the video file is now selected and c be saved. From MPEG Streamclip’s File Menu, Select Save As:
and then give the cut clip an new name:
Now to continue, play the original video clip, and select the rest of the subclips by pressing “I” (for IN), and “O” (for OUT), and save them in the same manner until all required subclips are saved in distinct files.
The final step in the manipulation of the clips is to splice two video clips together, specifically to follow Feb11-2011-006-4.MP4 with Feb11-2011-005.MP4. Yes, File 006 is followed by 005.
The splicing tool I used is SimpleMovieX ( http://simplemoviex.com/SimpleMovieX/info.html). The SimpleMovieX website has a tutorial to demonstrate how to join the two files: How to merge Movies. The tutorial shows two methods: The first involves pasting the video files on to the SimpleMovieX window, one after the other, but I couldn’t get this method to work. The second method involves pasting the two files at the same time. SimpleMovieX the asks if the files should be ordered by date or by name. In my case, the file dates were the same, and the file names gave the wrong sequence. So I just added ‘1’ and ‘2’ as prefixes to the files and pasted them to the SimpleMovieX window, and then save it from the File menu. I saved the merged file as a .mov, as the save as MPEG-4 option was greyed out, probably because the SimpleMovieX I was using was a Trial version. But the mov was good enough for me.
Now, I had 4 MP4 video files and 1 MOV video file. The original task of turning the original raw files from the event into smaller playable video files was finished. Next I put together these files into a DVD image and burned it to a disk. For this, I used the iDisk application that was included with Mac OS X. Describing this process is outside the scope of this post.
Final Notes
I started this post by noting that QuickTime wouldn’t play the original .MOV files. That was QuickTime 10.0 which comes with Mac OS X 10.6 (Snow Leopard). QuickTime 10.1 which is included with Mac OS X 10.7 (Lion) played the original files without any problem
The push to start this blog came about because a friend, whose site I maintain and update, asked me whether it could run on WordPress. He had seen another site which was comparable in purpose to his, and that site was beautiful, versatile and scalable and ran on WordPress. By contrast, the site that I ran for him was hand coded and had hardly changed in years.
But though I knew of WordPress (of course), I had never tried it or otherwise played with it. Also and though I should have known better, I thought of WordPress as blog software, rather than as web software.
Also, my daughter, a freelance graphic designer who created several websites using WordPress, both for herself as well as for clients had been pushing me to start a blog, and to use WordPress. She knows I’m opinionated, and basically has been saying to me, “create a blog to write your opinions and analyses instead of just talking and using your family as your captive audience”.
So these are the reasons that bring me here. What I expect to do is to take WordPress through its paces, explore its features one at a time, become proficient with it and have some fun. Whether I stick around to opine on my favorite subjects is another matter. We’ll see.